
These Watermelon Macarons have a flavored buttercream filling and green or pink — your choice —cookie shells. Includes step-by-step photos and tips for making perfect macarons.
Learning to Make Watermelon Macarons
I learned to make macarons by trial and error. The first time I made a batch, I lost several shells because I didn’t know how to pull them off the cookie sheet. Some were hollow inside, others had cracks, and some were hard, like vanilla wafers, instead of chewy, like perfect macarons. I think I experienced every possible problem the first time I baked macarons. One time when I was making macarons, I even left out half the dry ingredients because I was so intent on mixing the batter correctly! Since then, I have found better recipes and learned from experience.

Baking Tips for Watermelon Macarons
Using a Silicone Baking Mat
Here are some tips for baking macarons on a baking mat.
- Use a silicone nonstick baking mat, such as a Silpat or another equivalent brand, available at discount home goods stores or online. Some baking mats have reference circles printed on them, while others have indentations for macaron making. Macarons do not stick to these mats; they are washable, and you can use them for years. They come in different sizes to fit various baking sheets. This is my favorite way to bake macarons.
- Hold the piping bag perpendicular to the baking mat to pipe macarons correctly. This means pointing the piping bag tip toward the ceiling as you squeeze batter onto the silicone mat. This will make perfectly round macarons. If you hold the bag at an angle, the macarons will be odd shapes.
- If the macaron mat has no printed circles, try to pipe them all the same size. Then, after they bake, you can match similar-sized shells and fill them with buttercream; no one will notice the slight differences in size.


Using Parchment Paper
Here are tips for baking macarons on parchment paper.
- Use white parchment paper on top of a baking sheet as an alternative to a baking mat.
- Draw circles on the paper to help guide the size of the macarons. Use a 1 1/2-inch round cup or another round object, and draw around it, spacing the drawn circles to allow the macarons to spread when you tap them on the countertop to settle. Place the parchment paper on the baking sheet, drawing side facing down. (This prevents pencil lead or ink from cooking into your macarons.) You will be able to see the circles through the paper.
- Most recipes make more than one sheet of cookie shells, so you will theoretically need more than one baking pan. However, this is the reason parchment paper is a good choice. If you have at least one flat, rimless baking sheet, you can use additional sheets of parchment paper and pipe batter onto each one. Just keep each parchment sheet on a flat countertop. Then slide a rimless baking sheet under the parchment paper when a batch of cookies is ready to bake. After the cookies come out of the oven, cool them for a few minutes so the pan is not hot. Slide the parchment paper off the pan. Then slide the flat pan under another sheet of parchment paper with cookies and bake.

Using Other Cooking Surfaces
- I do not recommend using a greased cooking sheet because the baked shells will stick to it when you try to lift them. Use a silicone mat or parchment paper.
- Do not use wax paper or greased aluminum foil for macarons. Use one of my recommended methods because macarons are too much trouble to risk ruining them!

What to Do After the Watermelon Macarons are Piped
- Once you pipe the macarons onto the baking mat or parchment paper, immediately tap the pan a few times on the countertop to settle them. If you are making several sheets of macaron shells, tap them as soon as you fill one mat or parchment sheet– before you start the next one. If the cookie shells sit for too long, they dry out and won’t settle when you tap them later. This can cause a rough finish instead of the shiny, smooth finish that macarons are known for.
- After piping and tapping the shells, let them dry on top. They are ready when they do not stick to your finger when you touch them. Depending on the humidity, they may dry in 10 minutes or take an hour. Drying the cookie shells forms a skin on top. This helps to prevent cracking when they bake.

Baking the Watermelon Macaron Shells
- Macarons do not take long to cook. Keep an eye on them because you do not want them to turn brown; they will lose their pretty color.
- After baking, cool the macarons completely by letting them sit. Do not try to pull them up if they are warm, or they will not release from the baking surface. Once they are completely cool, they are easy to remove. One trick I use is to pick up the edge of the baking mat (or parchment paper) and pull it away from the macaron shell while gently holding the shell with two fingers. Pull the baking mat away one cookie shell at a time because they are fragile. Also, take your time when you remove them.


Storing Watermelon Macarons
Macarons have a short shelf life and will dry out in a few days. The best way to keep them fresh is to separate the ones you want to eat, then freeze the rest. If frozen, they will keep their fresh taste for a few months without altering the texture. One of my favorite ways to enjoy a macaron is to eat it partially thawed because it is chewy, which is the hallmark of a delicious macaron!

Other Posts You Might Like
Click on each name to link to the post.
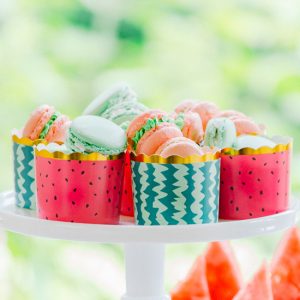
Watermelon Macarons
Equipment
- ex-large piping bag
- round tip (medium sized)
- 1 small star tip
- parchment paper or silicone mats
Ingredients
Cookie Shells
- 2 ¾ cups (275 g) almond flour (or almond meal)
- 2 cups + 1 tablespoon (250 g) confectioner’s (icing) sugar
- 6 ½ large egg whites, divided & at room temperature (place 6 egg whites in a bowl and 1/2 egg white into another bowl)
- 1 cup + 1 tablespoon (210 g) castor or granulated sugar
- green gel food coloring
Buttercream Filling
- 1 ½ sticks (3/4 cup) butter, softened
- 3 ½ cups confectioners' (icing) sugar
- 1/2-1 teaspoon watermelon flavoring (LorAnn Oils used)
- 2 tablespoons cream or whole milk
- red gel food coloring
- pink gel food coloring
- yellow gel food coloring
Instructions
Cookie Shells
- Place a nonstick silicone baking mat or parchment paper on a baking sheet. (See notes below.)
- Using a food processor, combine the almond flour and confectioners' sugar and process until the mixture is fine. Then sift the flour mixture, discarding any large almond pieces if necessary.
- Using a mixing bowl and the whisk attachment, beat 6 egg whites until foamy. Add 1/3 of the sugar and beat another minute until the sugar dissolves. Add half of the remaining sugar and beat another minute. Then add the rest of the sugar and beat until firm, glossy peaks form, about a minute or two.
- For pastel-colored cookies, add a small amount of green gel coloring and beat until well mixed. (For darker green cookies, add a larger amount of coloring.)
- Use a spatula to gently fold in the almond mixture into the egg whites. Mix well. The batter will be thick. Then, with a hand whisk, beat the 1/2 egg white until frothy. Stir this egg into the almond mixture to soften and moisten the batter.
- Snip the end of the piping bag and place the round tip into it. Then place the batter into the bag. (See tip for this in notes.) Fold over the top of the piping bag and then roll it down, and hold the top so none of the batter can escape. Position the bag over the baking sheet, holding it straight vertically. Pipe 1 1/2-inch round circles onto the baking sheet. Leave room between each circle for the batter to spread.
- Tap the baking sheet on the countertop to settle the macarons for baking. Let the macarons sit for about 30 minutes, so they form a dried skin on top. In very dry climates, they might dry out in 10 minutes. In very humid climates, it might take longer. Test the macarons to see if they are ready to bake by placing a finger on top of one. If the batter sticks to your finger, they are not ready. If no batter sticks to your finger, they are ready to bake.
- Preheat the oven to 300°F (150°C). Bake the macaron shells for 14-15 minutes. Do not brown them or they will lose their color. Let them cool completely after baking.
- Remove the macarons very gently by pulling the mat (or parchment paper) away from the shells. This method works better than trying to pull the shells off the cooking mat. Place the shells flat side up on a large cutting board or another surface. This will make it easier to add the filling to them, and they will also be easier to pick up.
Buttercream Filling
- Use an electric mixer to beat the butter until fluffy. Add the cream and watermelon flavoring and beat until well mixed. Start with 1/2 teaspoon of flavoring and taste. If you like a stronger watermelon flavor, add another 1/2 teaspoon of flavoring.
- Add the powdered sugar, one cup at a time, beating after each addition until smooth. If the frosting is too stiff, add more cream. If too soft, add a little more sugar.
- To color the frosting, add a few drops of pink gel coloring, one drop of red, and one drop of yellow to make a watermelon color. Beat the frosting to combine all the colors and mix well. If the color is not dark enough, repeat adding drops of gel coloring until the desired color is reached.
- Snip off the end of the piping bag and add the star tip to it. Add the frosting to the bag. To half of the cookie shells, pipe small stars on them. Then gently place the remaining cookie shells on top of the frosted cookie shells.
- Keep the macarons in an airtight container. You can store the macarons in the refrigerator for about 1 week or a freezer for 2-3 months. They dry out quickly so do not leave them stored on the countertop longer than 24 hours.
Notes
To Make Pink Macarons with Green Filling
- If you want to make pink shells with green filling, add pink, red, and yellow coloring to the macaron batter. Start by adding a few drops of pink, 1 drop of red, and 1 drop of yellow gel coloring. Repeat adding the coloring drops until the desired color is reached.
- To make the filling green, add a few drops of green gel food coloring to the buttercream after it is made. Beat it with a mixer to mix the color well.
Tips
Filling a Piping Bag with Batter
- Place the pointed end (with a round metal tip) of a piping bag into a very tall cup. Fold the top of the bag down over the sides of the cup so the bag is secured and ready to be filled with batter.
- If you do not have a metal tip for piping the batter, you can still use a piping bag. First, do not snip off the end of the piping bag. Place the piping bag over a cup and fill it. Once the bag is full of batter and you have secured the top, cut off the end of the bag and start piping.
- If you don’t have either a piping bag or a tip, try using a one-gallon-size zipper plastic bag. After you fill the bag, snip off one corner and pipe the batter through the hole onto a baking mat. Always start with a small hole and then snip off more of the corner if needed.
Filling a Piping Bag with Buttercream
- Use the cup method (see note above) to fill a bag with buttercream.
- Use a star tip to give the buttercream ridges and a star appearance, as seen on the sides of the finished macarons.