
Blackberry crisp is the perfect dessert to bring a burst of flavor to your table. Not only is it quick and easy to make, but the combination of sweet blackberries and a delightful cookie topping will leave your guests craving more!
Blackberry Crisp: No-Fuss Dessert
This recipe simplifies dessert-making by eliminating the need for a traditional pie crust. Layer the berries at the bottom of the pie dish, then add a cookie dough topping for a delicious, hassle-free treat!

A Taste of Texas
My first encounter with this blackberry pie was at a charming restaurant along the Guadalupe River in the historic district of Gruene, Texas. Although I can’t remember my entrée, the blackberry crisp made a lasting impression. It evoked memories of my apple crisp recipe, inspiring me to develop a blackberry dessert recipe.

Balancing Flavors in the Blackberry Crisp
Using Unsalted Butter in the Topping
The sweetness of this dessert pairs perfectly with a hint of salt in the topping. I recommend using unsalted butter and adding salt to enhance the flavor. When I made the topping without salt, it clearly needed that extra boost. Ultimately, a subtly salted topping elevates this dessert to a whole new level.

Using Salted Butter in the Topping
However, if you prefer to use salted butter, or that is what you have on hand, then reduce the amount of salt specified in the recipe. Each brand of butter is salted differently, so when you use salted butter, you must experiment to determine how much salt (if any) to add.

Can You Add a Crust to the Blackberry Crisp?
Yes, you can add a pastry crust to this blackberry crisp. It will provide a traditional pie-like texture and flavor. A flaky, buttery crust is a perfect base for the juicy blackberries, adding a layer of richness to each bite.

Cultivated vs Wild Blackberries
When preparing a blackberry crisp, you can use either cultivated or wild blackberries; both offer distinct qualities. Cultivated blackberries, typically found in grocery stores, are larger, sweeter, and more uniform, making them a good choice for baking. On the other hand, wild blackberries, which can be foraged in nature, tend to be smaller and have a more complex, tangy flavor. Keep in mind that wild blackberries can turn dark before they are ripe and leave a bitter aftertaste.

Fresh vs Frozen Blackberries
You can use frozen or fresh blackberries for this dessert. Fresh blackberries are often sweeter and have a firmer texture. On the other hand, frozen blackberries are a convenient choice because they are usually pre-washed and are available year-round. Additionally, they are typically harvested at peak ripeness and flash-frozen, preserving their flavor and nutrients. The downside of frozen berries is that they may release more juice during baking than fresh berries. You can remedy this by adding more flour or cornstarch to the filling.

Other Recipes You Might Enjoy
Click on each name or photo to link to the recipe.
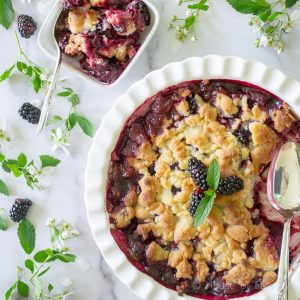
Blackberry Crisp
Equipment
- food processor
- 9-inch baking dish
- 1 sheet of aluminum foil
Ingredients
Blackberry Filling
- 5 cups blackberries
- ¼ cup brown sugar, packed
- 2 teaspoons vanilla
- 2 tablespoons all-purpose flour
- 2 tablespoons unsalted butter, melted
Topping
- 1 cup all-purpose flour
- ⅔ cup granulated sugar
- ¼ teaspoon salt
- 1 stick unsalted butter, softened
Instructions
Blackberry Filling
- Preheat oven to 375°F. Spray a 9-inch round baking dish with cooking spray.
- Evenly distribute the blackberries on the bottom of the baking dish. Mix 2 tablespoons of flour with the brown sugar, and sprinkle it over the blackberries. Add the vanilla to the melted butter, then drizzle it over the berries.
Topping
- Add the flour, granulated sugar, and salt to a food processor. Pulse to blend.
- Cut the butter into 8 pieces and place (spread out) on the flour mixture. Process until the mixture forms a dough. (If you do not have a food processor, work the mixture by hand or with a mixer.)
- Break the dough into small pieces and place over the blackberries.
- Bake for 40 minutes or until the topping is golden brown. If necessary, place a sheet of aluminum foil over the pie during the last 10 minutes of baking to prevent overbrowning.