
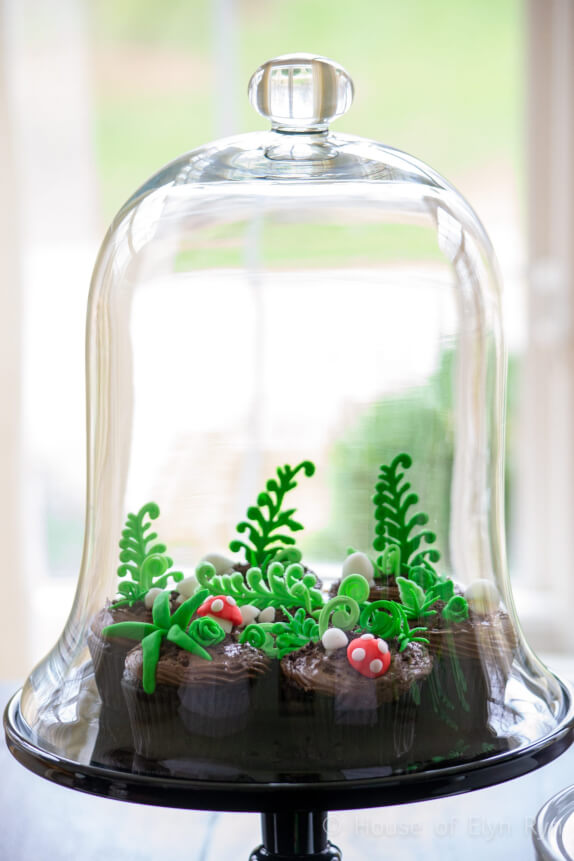
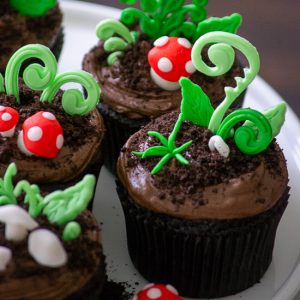
Indulge in these terrarium chocolate cupcakes, which combine triple-chocolate flavors with a miniature garden made from fondant. By adding a touch of creativity to your dessert table, you’ll impress your guests and satisfy their sweet cravings!
Terrarium Chocolate Cupcakes: A Delicious Treat
Cupcakes have an undeniable charm, especially when they come dressed with eye-catching decorations. The inspiration for these treats struck me while I was writing a magazine article about spring gardening and its connection to a seasonal recipe. It was then that the idea of terrarium cupcakes blossomed in my mind, featuring delicate ferns and whimsical mushrooms sprouting from rich, dark chocolate soil.

Why Terrarium Cupcakes?
The concept of terrarium cupcakes is captivating. They transform ordinary cupcakes into miniature landscapes filled with edible decor. The combination of chocolate cake, rich frosting, and vividly colored fondant makes for a visual feast. Plus, you don’t need extensive baking skills to craft these beauties; with a little creativity, anyone can create their own edible garden.

Preparing the Decorations for Terrarium Chocolate Cupcakes
There is an order to creating these cupcakes. First, make the fondant decorations. Always begin by squeezing and folding the fondant until it’s pliable and ready to use. Keep any unused fondant sealed when not using it, or it will dry out. Also, do not store leftover pieces in the refrigerator; keep them at room temperature instead.
Start on the decorations a couple of days in advance. This lets the mushrooms and greenery dry out and harden, ensuring they hold their shape when it’s time to assemble the cupcakes.
Making Ferns
To create an authentic terrarium look, use fondant molds for ferns and other plants you want to use. Then, freestyle mushroom shapes by hand. Begin by coloring white fondant with green gel food coloring. Then press it into the fern mold, leveling the back to make it smooth. Turn the mold over and release the shape. Place it on waxed paper to dry, and continue making ferns until you have enough to decorate all the cupcakes.

Making Leaves for Chocolate Terrarium Cupcakes
If you want to make leaves for your cupcakes, use small nested cutters to cut fondant into leaves. Otherwise, use a knife to cut out a leaf shape. Then, use the tip of the knife to make “vein” cuts to add texture to the leaves.

Making Mushrooms for Chocolate Terrarium Cupcakes
Then make mushrooms, some out of white fondant, and others out of red-dyed fondant to look like toadstools. First, you can make mushroom stems by rolling a rope out of white fondant. Cut it into short pieces for stems, making sure it has a flat bottom that will stand. To make mushroom caps to fit over the stems, make a small ball out of white and then flatten it. Place it over the stem and press it downward to cover it.
To make toad stools with red caps and white dots, color a small amount of white fondant with red gel coloring. Make a ball and flatten it. Then make tiny balls and flatten them. Press them into the red cap in a random pattern.

Baking the Chocolate Cupcakes
Once your decorations have hardened and are ready, it’s time to focus on the chocolate cupcakes. The rich, chocolate cake is the perfect base for the whimsical toppings. Bake them in dark brown or black cupcake liners to further the illusion of dark, rich soil.

Frosting and Assembling the Cupcakes
The next step is to prepare the dark chocolate frosting. Spread or pipe frosting onto the cooled cupcakes to create a flat top for decorations. Add a sprinkle of crushed Oreo cookies on top to mimic dirt.
Then it’s time to bring your terrarium cupcakes to life with the fondant decorations. Carefully place the greenery and mushrooms onto each cupcake, arranging them as if they were sprouting in a miniature garden. Use your imagination to create unique looks for each cupcake, making every one a little different from the next.

Storing Chocolate Terrarium Cupcakes
You can store these cupcakes in a bakery box on your countertop for 2 to 3 days. Do not store fondant decorations in the refrigerator, as they can become soft and sticky. Ideally, it is best to add the fondant decorations just before serving the cupcakes to keep them fresh.

Other Cupcake Recipes You Might Like
Click on each name or photo to link to the recipe.
Terrarium Chocolate Cupcakes
Equipment
- 24 cupcake liners, dark brown or black
- muffin pan
- Wilton Fern Designs Fondant and Gum Paste Mold
- plastic or latex gloves
Ingredients
Chocolate Cupcakes
- ⅔ cup sour cream
- ¾ cup buttermilk, room temperature
- ⅓ cup vegetable oil
- 1 tablespoon vanilla extract
- 3 large eggs, room temperature
- 1 egg white, room temperature
- 1 box dark chocolate cake mix (15.25 ounces), sifted
- ½ cup dark chocolate cocoa powder, sifted
- ½ cup mini chocolate chips
Chocolate Frosting
- 2 cups semi-sweet chocolate chips
- 1 cup heavy cream
- 1 cup butter, softened
- 1 pinch of salt
- 1 tablespoon vanilla extract
- ¼ cup dark chocolate cocoa, sifted
- 6-7 cups powdered sugar, sifted
Cupcake Decorations
- 1 box white fondant (24-ounce box Wilton Decorator Fondant used)
- green gel food coloring
- red gel food coloring
- 6-8 Oreos, filling removed and crushed (or similar dark chocolate cookie)
Instructions
Chocolate Cupcakes
- Preheat oven to 325°F. Place cupcake liners in a cupcake pan.
- In a large mixing bowl, add the sour cream, buttermilk, oil, vanilla, and eggs. Whisk until well combined. Sift in the cake mix and cocoa. Add the chocolate chips and stir until combined. Do not overmix.
- Divide evenly between 24 cupcake liners. Bake for 15-17 minutes or until a toothpick inserted into the center of a cupcake comes out clean or with crumbs. Cool on a wire rack.
Chocolate Frosting
- In a microwave-safe bowl, place the chocolate chips and cream and heat on high for 30 seconds. Stir. Heat for an additional 30 seconds, stirring again until melted. Set aside.
- In a mixing bowl, beat the butter until fluffy, scraping down the sides of the bowl as needed. Add the melted chocolate mixture, salt, vanilla, and cocoa powder. Beat until well mixed.
- Add the powdered sugar 1 cup at a time, beating until smooth.
- Spread or pipe the frosting onto the cupcakes. Sprinkle cookie crumbs onto the cupcakes.
Fondant Decorations
- Wearing gloves to prevent stained fingers, pull off a large piece of fondant, and add a small amount of green gel coloring. Fold and work the fondant until the color is consistent throughout. Divide the green fondant in half, then place one half in plastic wrap. Add more green gel to the other half and work the fondant until the color is well mixed. This gives you two shades of green to mold.
- Using the fondant mold, firmly press the darker-green-colored fondant into the desired mold shapes. Then use a metal spatula to scrape off all excess fondant from the top of the mold shapes. To release the shaped fondant, pull the sides of the mold, then turn it upside down and tap until the shape releases. Continue making shapes with the two green colors until you have made enough for 24 cupcakes.
- Pull off a small piece of fondant. Add red gel coloring and work the fondant until the color is well mixed.
- Roll the red fondant into small balls, then flatten them into caps for the red mushrooms' tops. Using white fondant, make tiny balls, flatten them, and scatter them onto the mushroom tops. Make mushroom bottoms from white fondant. Roll a piece into a thick rope and then cut it into ½-inch pieces. Flatten one end so it stands. Place the mushroom cap on top of the base and press it down, so it curves down like a mushroom cap. Repeat to make several red mushrooms.
- Use white fondant to make small white mushrooms. Use the same technique as used for the red mushrooms, minus the dots on top. Create other shapes from fondant using your imagination.
- Let the shapes dry and harden for 2 days. Then decorate the cupcakes.