
The Flag Cake is a stunning dessert that combines visual appeal with delicious flavors, making it the perfect showstopper for any celebration. With its hidden surprise and easy construction, you’ll love making this cake that brings a festive touch to your gatherings!
Wow Factor Flag Cake
You will be impressed by this stunning cake! It may appear elegant and simple on the outside, but it holds a delightful surprise inside—a flag that reveals itself when you slice into it. This cake is perfect for any patriotic celebration and, surprisingly, it’s quite easy to make. While it looks complicated, the real star here is the flag hidden within!

Frosting and Flavor
I chose to frost this cake with basic white piped stars, allowing the flag inside to be the true standout feature. Not only does this cake look impressive, but the combination of vanilla cake with vanilla buttercream also offers a phenomenal taste. Plus, the cake batter is easy to prepare because you only need to stir it by hand, using a mixer solely for the buttercream.
Layering the Cake
The cake layers rise beautifully, making it easy to cut or split them in half. For instance, I set a knife on risers and sliced the white layer into two pieces.

Next, I used a 4-inch cookie cutter to create a 4-inch layer from one of the split 9-inch white layers, setting the other layer aside for later.

Then I trimmed the 9-inch red layer in half as well, reserving these layers for assembly later.

After that, I baked a 6-inch red layer and cut a 4-inch circle from it with a cookie cutter. This piece will snugly fit into the cake during the construction process. Don’t worry about the leftover doughnut-shaped cake—you can discard it or enjoy a tasty snack!

Use the cookie cutter to cut out a 4-inch circle from the blue layer. Use the doughnut, but discard the middle 4-inch layer.

Flag Cake Construction
Now, let’s start constructing the cake! First, place a red layer on a cake platter and add a layer of frosting. Then, stack a white layer on top and frost again. Add another red layer, frosting, a white layer, and frosting.

Finally, place the blue donut layer.
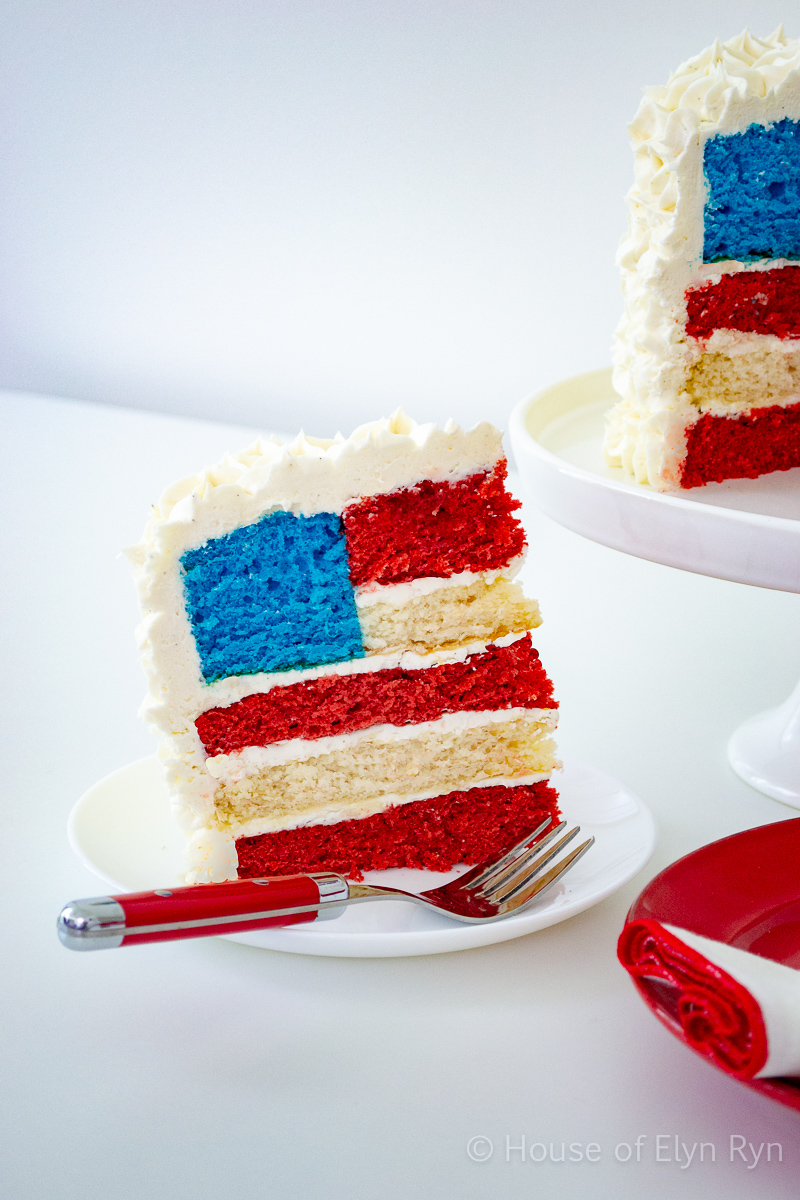
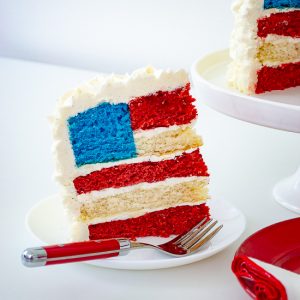
In the photo below, you can see the pattern: red layer, frosting, white layer, frosting, red layer, frosting, and then the blue donut layer that has the hole. Place a 4-inch white layer in the blue hole and push it to the bottom. Add a layer of frosting. Then place the red 4-inch layer in the hole and level it with the top of the blue layer. Now you have a complete cake, and the middle holes are filled.

Final Touches
To finish, apply a skim coat of frosting over the entire cake. Using a large star tip with a large piping bag, pipe stars all over the surface of the cake. For any exposed cake areas, fill them with smaller stars with the same star tip, using less pressure.

This cake stands tall as a five-layer masterpiece. The blue layer is considered two layers because of the white and red 4-inch layers inside the doughnut hole.

While it appears deliciously unassuming, the true magic happens when you slice into it. The surprise inside becomes instantly apparent!

The piped stars also add to the patriotic look, creating a festive appearance that captures the spirit of any celebration.

Even better, the cake tastes as good as it looks, with a perfect blend of vanilla flavors that will delight everyone at your gathering!

Other Recipes You Might Like
Click on each name or photo to link to the recipe.

Flag Cake
Equipment
- (3) 9-inch cake pans
- (1) 6-inch cake pan
- (1) 4-inch round cookie cutter
- parchment paper (cut out circles that will fit into the bottom of each pan)
- sifter
- 1 large star tip (1M)
- 1 large piping bag
- 3 baking strips (see note below)
Ingredients
Cake Ingredients
- 1 ⅓ cups sour cream, room temperature
- 1 ½ cups buttermilk, room temperature
- 2 tablespoons vanilla extract
- 8 egg whites, room temperature
- ⅔ cup vegetable oil
- 2 Duncan Hines white cake mixes
- red food coloring
- blue food coloring
Buttercream Frosting Ingredients
- 2 ¼ cups (4 1/2 sticks) unsalted butter, room temperature
- 1 ½ tablespoons vanilla extract
- 2 teaspoons vanilla bean paste
- 1 pinch of salt
- ¼ cup plus 2 tablespoons heavy cream
- 9-10 cups powdered sugar, sifted
- shortening
- extra powdered sugar (for coating the pans)
Instructions
Directions for Cake
- Preheat oven to 325°F. Prepare (3) 9-inch cake pans and (1) 6-inch cake pan by coating with shortening and then dusting with powdered sugar. Cut out round parchment circles and fit them into the bottom of each prepared pan. Set pans aside.
- In a large mixing bowl add the sour cream, buttermilk, vanilla, egg whites, and vegetable oil. Whisk until thoroughly mixed.
- Sift the cake mix into the liquid mixture. Stir until combined and smooth, but don’t overmix.
- Divide the cake batter between 3 medium bowls. In the third bowl, place a little more batter than the other two bowls so that there will be enough red batter for (1) 9-inch pan and the 6-inch pan. It does not take much batter for the 6-inch pan, so just eyeball it.
- To the third bowl that has more batter, add several drops of red food coloring until you like the color. Fill the 9-inch and the 6-inch prepared pans with the red batter.
- In another bowl of batter, add drops of blue food coloring and stir. Keep the color intensity the same as the red batter. Pour the blue batter into a prepared 9-inch pan.
- Finally, pour the white batter into the last 9-inch prepared pan. To help ensure flat layers, place baking strips around the 9-inch pans. (See note below about baking strips and how you can make your own.) Bake layers at 325°F for 25-27 minutes or until a toothpick comes out clean. Cool on a wire rack.
Directions for Buttercream
- Using a large mixing bowl and mixer, beat the butter until smooth. Add the vanilla extract, vanilla bean paste, salt, and cream. Beat well. Sift in the powdered sugar and beat until smooth, 3-5 minutes. Add more cream if needed for a thinner frosting.
Directions Cake Assembly
- Level any domed layers with a knife by shaving off the peaks. Then use a long knife to split the white cake layer into two same-size round layers. Set aside one layer. Then use the 4-inch round cookie cutter to cut out a 4-inch round in the middle of the other layer. Discard the “donut” but save the 4-inch round.
- Using the same long knife, split the 9-inch red layer into two same-sized round layers. Set layers aside for later. Then, using the cookie cutter, cut a 4-inch round out of the 6-inch cake layer. Discard the donut from the 6-inch layer, but save the 4-inch round.
- Center the cookie cutter in the exact middle of the blue layer and cut a 4-inch round. Save the blue donut but discard the 4-inch round.
- In the middle of a cake platter, place a small dollop of frosting to stabilize the bottom cake layer. Then place the layers in the following order with frosting spread between each layer: a red 9-inch layer, a white 9-inch layer, a red 9-inch layer, and the blue 9-inch donut. Inside the hole of the blue layer, place a white 4-inch round layer and frost it. Next, place the 4-inch red round layer into the hole. Finally, frost the whole cake with a thin layer of frosting. Then, using a large star tip, pipe buttercream stars all over the cake.
Notes
Parchment Paper
When using parchment circles in the bottom of your pans, make sure they lie flat. It is better to have a smaller paper so it doesn’t go up the sides, which can distort the shape of the layer.Baking Strips
To get a flat cake without a middle dome, use wet baking strips around the cake pan. You can buy these at craft stores in the cake-baking section, or you can make your own. To create a baking strip using a towel, first cut a piece that is long enough to wrap around your cake pan and tall enough to fold over for a double layer. Dampen the strip so that it is very wet, but not dripping. Overlap the ends and secure them with safety pins until the strip fits snugly around the pan. Next, pour your batter into the pan and bake as usual, keeping in mind that it may take an additional 5 minutes or more because cakes typically bake more slowly with wet strips. The purpose of the baking strips is to prevent the edges of the cake from cooking too quickly, helping avoid a dome in the center.Red Velvet
You can make the red layer into red velvet cake by adding 1 tablespoon of cocoa powder and 1 teaspoon of vinegar to the red batter.Red Food Coloring
Some red food coloring turns brown. I have found that Christmas Red Gel by Lorann Oils (click here for lorannoils.com) has a bright, non-changing red color.Cutting the Layers
- If you don’t have a 4-inch cookie cutter, you can make a template from parchment paper and cut around it to make 4-inch cake layers. Also, a 4-inch round bowl can be used as a guide. However, the more exactly you cut the layers, the better the cake will look.
- Be sure to wipe off the cookie-cutter after you cut each layer so you don’t transfer crumbs to the next layer.
- The layers of this cake are easier to work with if you freeze them before frosting. If you make this cake over 2 days, freeze the layers overnight. Otherwise, freeze layers for a couple of hours.