
Infuse your Halloween table with a dash of spooky elegance using these enchanting black butterfly napkin rings. Step into the magic—your template awaits!
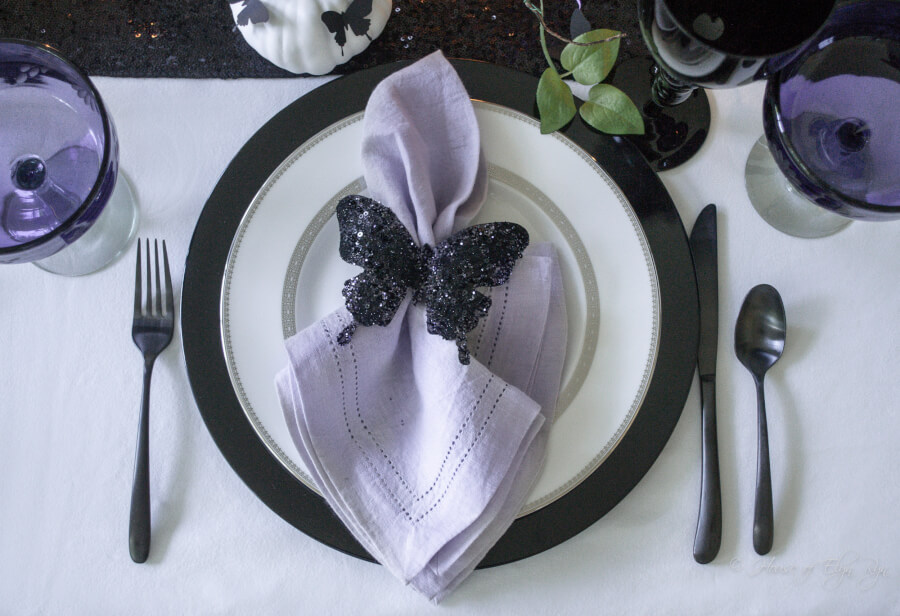
Black Butterfly Napkin Rings
Planning a Halloween bash or simply want a festive makeover for your table? Making black butterfly napkin rings is a fun, stylish DIY that’s sure to bring smiles. Let’s flutter right into the step-by-step fun!

Supplies Needed to Make Butterfly Napkin Rings
These are the basic supplies you will need:
- Butterfly Template
- Black cardstock
- Thin black hair elastics
- Adhesive spray glue
- Extra fine black Glitter
- Larger black sequin glitter – purchase the smallest amount
- Navy chunky glitter
- Clear sealant spray
Not shown:
- Glue gun and glue sticks
- Printer
- Scissors
- Light graphite tracing paper (optional)
- Stylus (optional)
Use a Template for Butterfly Napkin Rings
To get started, use the butterfly template. Each butterfly is approximately 5 x 4 inches (12.7 x 10.16 cm). Click here to download the PDF template and print your butterflies.

Print Butterflies on Black Cardstock
Print the template on 8 1/2 x 11-inch black cardstock. The printer ink is usually a different shade of black from the cardstock. Tricky to see? Simply print them in a different color.
Or kick it up a notch—print your template on plain paper, then trace it onto black cardstock using light graphite paper.
Another option is to print the template on regular printer paper and use light-colored graphite tracing paper to trace it onto black cardstock. If you use this option, place a black cardstock sheet on a table first, add the graphite tracing paper, and then place the template on top of it. When I use this method, I tape down the top pattern so that it doesn’t slip while tracing. Use a stylus or an empty ballpoint pen to trace.

Cut the Butterflies
Snip out your butterflies—the fun really begins now as they get ready to sparkle!

Use Spray Adhesive for Butterfly Napkin Rings
Coat the front of the butterfly with spray adhesive–just remember to cover the spray area with paper and work in a well-ventilated area. Or grab a glue stick for these napkin rings. Whichever you choose, thoroughly cover the butterfly’s front with glue for best results.

Add Glitter to Butterfly Napkin Rings
Mix fine glitter and sequins for a modern, eye-catching effect! I grabbed both black and navy blue glitters (with a surprising hint of purple!) to start. Next, I tossed in larger black sequined glitter for a bold touch.

Completely coat the front of the butterfly with glitter until they are shimmering.

Seal the Butterfly Napkin Rings
Let the napkin rings dry thoroughly. Then seal them with a clear acrylic coating so your sparkles stay set.
A non-yellowing sealer, as shown below, helps keep your colors looking fresh. Place the butterflies on paper in a ventilated area and give them a protective misting. Follow the drying time directions, then recoat for a sparkly, sealed finish. Let dry, and enjoy the shimmer!

Flatten Curled Butterfly Napkin Rings
If your napkin rings curl after getting a sticky mist from adhesive spray, don’t fret. Just fix them before adding their elastic rings. Lay wax paper over the dry, glittery side, set a heavy book or flat object on top, and let them straighten out for a perfect flat finish.

Attach an Elastic Ring
When the butterflies are dry, add the hair elastics to the back of each butterfly. I used the elastics for fine hair, which are smaller than regular-sized elastics.

Use hot glue to attach the elastics.

Let the hot glue dry completely. Then place the napkin rings around your napkins.


Other Butterfly Halloween Posts You Might Enjoy
Curious to try more? Click either name below to leap to the next spooky adventure!