
See how easy it is to make a striped peppermint cheesecake with this step-by-step recipe. Festive and unique, it is the perfect party food!
Surprise Inside
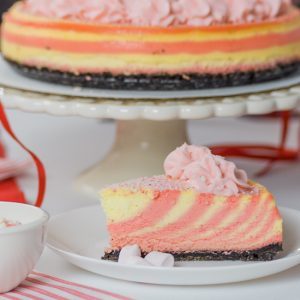
I enjoy creating desserts with decorative stripes! There’s something delightful about cutting into a dessert and discovering a surprise design inside. This peppermint cheesecake is perfect for a style known as zebra stripes. While it’s a stunning dessert to present during Christmas, it also shines on Valentine’s Day. The stripes are simple to create and just require measuring the batter to get this effect. If zebra stripes aren’t your thing, you can opt for a fully pink or white cheesecake instead. This recipe not only results in a lovely pink dessert but is also a fantastic way to use up any leftover Christmas candy canes.

Zebra Stripes
The outside of this cheesecake looks like layers of stripes. However, inside, the pattern looks like zebra stripes. There is an easy technique to get this effect, which I explain and illustrate below.

Making the Crust for the Striped Peppermint Cheesecake
For the crust, opt for dark chocolate cookies—I used Oreo sandwich cookies. I used to believe that you had to separate the cookies and take out the sweet filling when baking with sandwich cookies, but I found out that it’s not necessary at all. Simply toss the whole sandwich cookies into a food processor and pulse them until crushed. If you don’t have a food processor, no worries! Just place the cookies in a large plastic zipper bag, squeeze out the air, and use a rolling pin to crush them.

Measuring the Cookies
Make sure to measure the cookies after crushing them. If you measure them beforehand, you might end up with an insufficient amount for the crust. Once crushed, mix in the melted butter with the cookies. Since I used sandwich cookies that already had a sweet filling, I didn’t add any sugar to the crust because the cookies provided enough sweetness. However, if you use dark chocolate cookies without a filling, feel free to add 1/4 cup of sugar to the crust for an extra sweet touch. Just add the sugar when you combine it with the melted butter, and then mix everything together thoroughly.
Preparing the Pan
If you add grease and then parchment paper to the bottom of the springform pan, you can remove the metal bottom from the cheesecake if you desire. This will let you place the cake on a cardboard base or a cake pedestal. The parchment paper also helps ensure that the cheesecake is easy to remove from the pan after slicing.


Coloring the Batter for the Striped Peppermint Cheesecake
The pleasing stripes in this cheesecake are easy to make. However, you will need to divide the batter evenly between two bowls with a food scale or a measuring cup. Add pink or red food coloring to one bowl of batter. Do not color the other bowl of batter.


Add as much or as little coloring as you choose. The recipe provides guidance on the amount to use. However, if you want subtle stripes, use less food coloring. For bold stripes, use more food coloring.

Add the Batter to the Pan
The trick to making the stripes in this cheesecake is to measure the batter carefully. Starting with the pink batter, add 1/2 cup of batter to the center of the prepared crust. Do not spread it out or shake the pan. Then, using a different measuring cup (so that you do not have to wash and dry it as you alternate between colors), measure 1/2 cup of white batter. Pour it on top of the pink batter in the middle of the pan.


Repeat the process, alternating the colors until all the batter is used. Always measure the batter carefully so that the stripes will be even. Do not tap the pan after filling it. If there are air bubbles in the batter, as shown in the photo below, leave them because they usually disappear during cooking.

Bake the cheesecake according to the recipe’s directions. Let it cool, then place it in the refrigerator for 6 to 8 hours or overnight. If decorating the cheesecake, do it the next day.
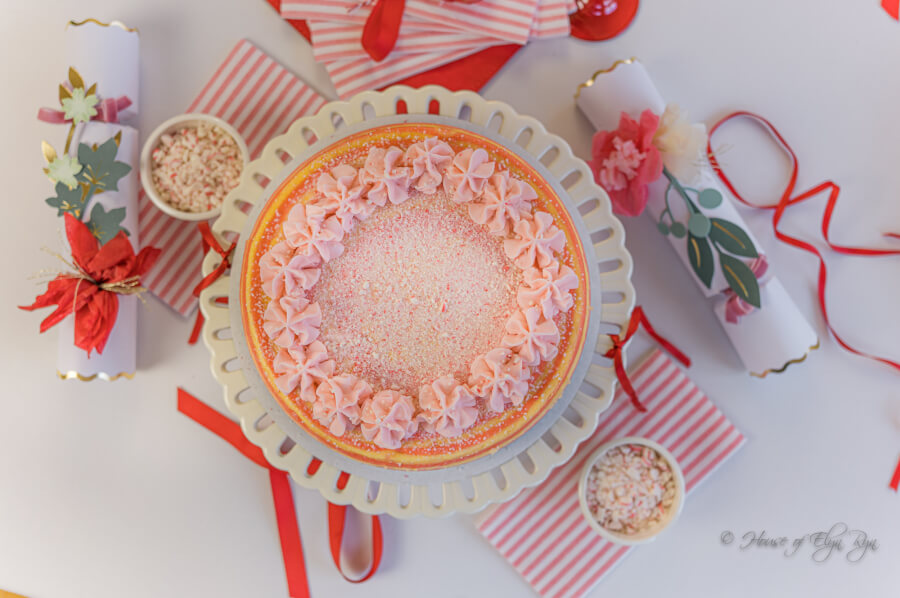
Decorating the Cooked Striped Peppermint Cheesecake
You can decorate the top of the striped peppermint cheesecake with whipped cream if you choose (as shown below). Use a piping bag and star tip to pipe star ruffles around the cake. To evenly space them, place one star on the edge of the cheesecake. Then place another one directly across from it on the opposite edge of the cheesecake. Repeat the order as shown in the photo below.

Cut Perfect Striped Peppermint Cheesecake Slices
There are a couple of tricks to cutting perfect cheesecake slices. The main trick is to freeze the finished cheesecake. Then set out the cheesecake to thaw for 20-30 minutes or until it is only partially frozen. Use a large, smooth-edged knife to cut it. First, heat the knife in hot water. Then make a cut to the center of the cake. Wipe the crumbs off the knife and heat it again in hot water. Cut the other side of the cheesecake slice. Wipe off the knife and repeat the procedure until all cake slices are cut. Use this procedure to get clean, perfect cheesecake slices, as shown in the photo below.

Removing the Springform Bottom
You can serve the cheesecake on the flat bottom of the cake pan, which is the easiest way to present it. But for special occasions, you might want to place the cake directly onto a pedestal, cardboard, or plate. Two things make this possible: using parchment paper under the crust (as explained in Preparing the Pan above) and freezing the cheesecake.

How to Remove the Pan Bottom
Place a cardboard circle (or a flat plate) on top of the frozen cheesecake while it is still in the pan. Invert the cheesecake. Use a hairdryer to heat the bottom and sides of the pan. Tap the pan against the edge of the counter while holding the cardboard in place. Remove the pan ring. Then carefully remove the pan bottom from the cake. The parchment paper will stick to the cheesecake. Carefully peel it off. Then place your chosen serving vessel on top of the inverted cake. Flip it over. The cake is now ready for serving or adding decorations to the top.
I hope you enjoy this recipe for Striped Peppermint Cheesecake!
Other Cheesecake Recipes You Might Enjoy
If you like this recipe, here are some other recipes you might like:

Striped Peppermint Cheesecake
Equipment
- (1) 9-inch springform pan (3 inches deep)
- 1 large oven pan for water bath
- 2 medium mixing bowls
- 2 equal-sized measuring cups
- parchment paper
Ingredients
Crust
- 2 cups dark chocolate sandwich cookies, crushed (Oreos used; measure after crushing cookies)
- 4 tablespoons butter, melted
- cooking spray
Cheesecake
- (4) 8-ounce blocks full fat cream cheese, room temperature
- 1 cup + 2 tablespoons granulated sugar
- 1 ¼ teaspoons peppermint extract
- 4 large eggs, room temperature, and lightly beaten
- 2 large egg yolks, room temperature, and lightly beaten
- ½ cup cream, room temperature
- 6-10 drops red gel food coloring
Instructions
Crust
- Preheat the oven to 350°F. Spray the springform pan with cooking spray. Cut a round piece of parchment paper that is the size of the inside bottom of the pan. Then, add the parchment paper to the bottom of the sprayed pan.
- Crush the cookies in a food processor or chopper until finely crushed.
- Stir in the melted butter until well combined. Press the mixture into the bottom of the springform pan until smooth. Use a flat cup bottom to tamp down the cookie crumbs.
- Bake for 12 minutes. Let cool.
Cheesecake
- Reduce the oven temperature to 300°F.
- In a mixing bowl, beat the cream cheese and sugar until smooth. Scrape the bowl on the sides and bottom 2 or 3 times and then beat any lumps until they dissolve.
- Add the peppermint and beat.
- Add the eggs and yolks, one at a time, beating just until blended.
- Stir in the cream until mixed.
- Divide the batter between two bowls, using a measuring cup to evenly divide the batter. Set the bowl with white batter aside.
- To the other bowl of batter, add 6-10 drops of red food coloring. Use fewer drops to make a pink batter and more drops to make a red batter. Stir to mix well.
- Set the cooled crust in the springform pan in front of you. Measure ½ cup of white batter and pour it into the center of the cooled crust. Measure the batter carefully so that the stripes will be pleasingly proportioned.
- Use another measuring cup and pour ½ cup of the pink batter into the center of the crust on top of the white batter.
- Measure ½ cup of white batter again and pour it over the pink batter. Continue alternating colors until both of the batters are used, pouring the batter into the center of the pan each time. Do not shake or lift the pan during the layering process.
- Fill a large flat pan with hot water and place it in the preheated oven on the lowest rack.
- Place the cheesecake on the rack above the hot water. Bake for 1 hour and 20 minutes. If the cheesecake starts browning on top before the cooking time is up, spray a piece of aluminum foil with cooking spray and place it gently on top of the cheesecake.
- At the end of the cooking time, remove the cheesecake from the oven. It will jiggle slightly in the middle when you move it. If it seems liquid in the middle, bake it for an additional 10-15 minutes.
- Let the cheesecake cool for 2 hours. Then refrigerate it for 6-8 hours.
- Decorate the cake with finely crushed peppermint candies and whipped cream if desired. To serve, remove the pan ring and slice.